

How To Transfer Photos From Canon 6d To Phone
Solution
Step 1: Connect the smartphone to the wireless LAN
IMPORTANT
- Please refer to the "Related information" section at the bottom of this page for specifications and arrangement requirements of the smartphones which tin can exist continued wirelessly.
- To communicate with a smartphone, the photographic camera needs to be connected to the smartphone using the dedicated application Photographic camera Connect.
- Photographic camera Connect tin be downloaded from the App Shop or Google Play. Install Camera Connect on the smartphone and then perform the procedures to establish the connection.
- Interface or functions of Camera Connect are subject to modify, for application comeback or update. In such a case, features of Camera Connect may differ from sample screens or operation instructions in this explanation.
If a Wi-Fi connexion to the camera cannot be made using Photographic camera Connect, please refer to The camera cannot be connected via Wi-Fi using Photographic camera Connect.
1. Set the ability switch to <ON>.

two. Printing the <Carte> push button to brandish the menu screen.
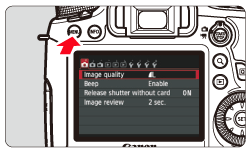
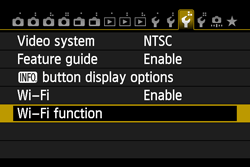
iii. Nether the [  ] tab, select [Wi-Fi], then press <SET>.

4. Press the <Multi-controller> to select [Enable], then printing <Ready>.
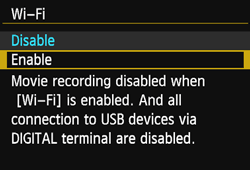
[Wi-Fi function] is now selectable.
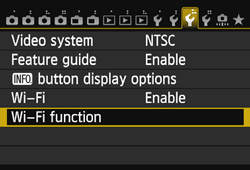
5. Under the [ ] tab, select [Wi-Fi part], so press <SET>.
REFERENCE
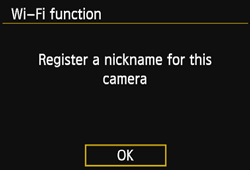
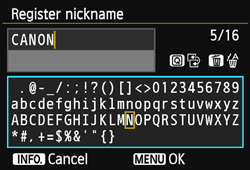
When yous first use this setting, a screen appears prompting you lot to register a nickname for your camera.
When the camera is connected to another device via a wireless LAN, the nickname will be displayed on the device. Be sure to fix a nickname for your camera.
Select [OK], then enter a nickname. (Upward to 16 characters tin exist entered.)
When you lot are finished, printing the <MENU> button.
Select [OK] on the confirmation screen, and so press <SET>.
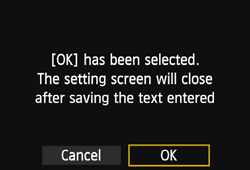
The nickname is registered, and [Wi-Fi role] screen will appear.
NOTE
Virtual Keyboard Performance
- Switching to other input areas
To switch between peak and lesser input areas, press the <Q> button.
- Moving the cursor
To move the cursor, printing the <Multi-controller> in the top area.
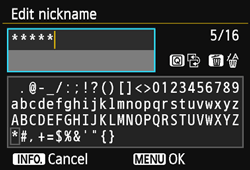
- Entering text
In the bottom input area, press the <Multi-controller> to select characters and press <Fix> to enter them.
Y'all tin can bank check how many characters you accept entered, and how many more than can be entered, past referring to [*/*] on the upper right of the screen.
- Deleting text
If y'all brand a mistake, press the < > button to erase it.
- Finishing text entry
Press the <MENU> button to confirm what you take entered and leave. If a confirmation screen is displayed, select [OK] to exit.
- Canceling text entry
Press the <INFO.> push to cancel text entry and go out. If a confirmation screen is displayed, select [OK] to exit.
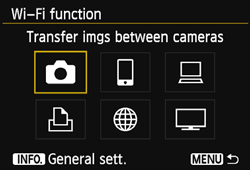
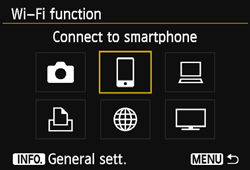
6. Select [  ] (Connect to smartphone) and press <SET>.
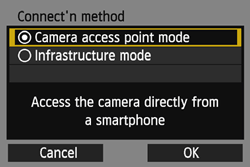
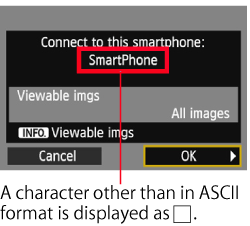
7. Press the <Multi-controller> to select [Photographic camera admission bespeak mode], then press <SET>.
Select [OK] and press <Set up> to get to the next screen.
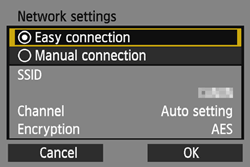
viii. Press the <Multi-controller> to select [Easy connection], so press <Set>.
Select [OK] and printing <Prepare> to become to the screen in step nine.
REFERENCE
When [Manual connectedness] Is Selected
Set [SSID], [Aqueduct setting], and [Encryption settings] on each screen displayed.
- Enter an SSID.
Enter any character using the virtual keyboard.
When you are finished, press the <MENU> button.

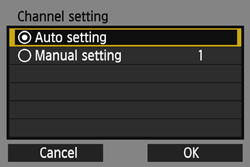
- Select [Motorcar setting] and printing <Gear up>.
Select [OK] and press <SET> to get to the next screen.
To select manually, select [Transmission setting] and turn the <Primary Punch>.
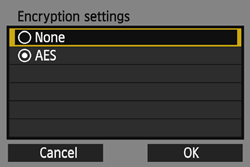
- Select [None] and press <Set up>.
Select [OK] and press <Prepare> to become to the screen in footstep nine.
For encryption, select [AES], and then enter any encryption central using the virtual keyboard.
9. Connect the smartphone to the camera.
- On the Wi-Fi settings menu of the smartphone, select the SSID (network name) displayed on the camera'southward LCD monitor.
- For the countersign, enter the encryption key displayed on the camera's LCD monitor.
-> The next screen may be automatically displayed even when the functioning on the smartphone is not completed.
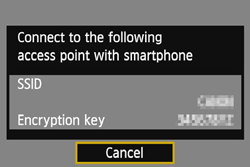
Practise not press [Cancel] until you take completed the setting.
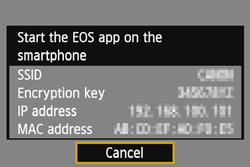
10. Start Camera Connect on the smartphone. Exercise not press [Cancel] until yous have completed the setting.
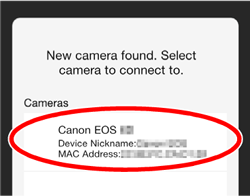
11. Select and touch the camera to connect to from [Cameras] on Camera Connect to constitute a connection.
12. Connect to the camera.
Printing the <Multi-controller> to select [OK], then press <SET>.
13. Perform further settings.
To terminate settings in this phase, press the <Multi-controller> to select [OK], then press <SET>.
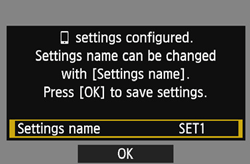
fourteen. Select [OK] and press <Prepare> to save the settings.
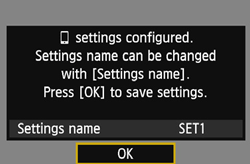
15. The [ Connection] screen will be displayed.
The settings for communicating with a smartphone are now complete.
Step 2: Viewing and Saving Images with the Smartphone
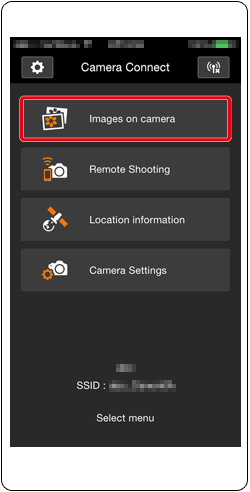
1. Select [Images on camera] from the Camera Connect master window on the smartphone.
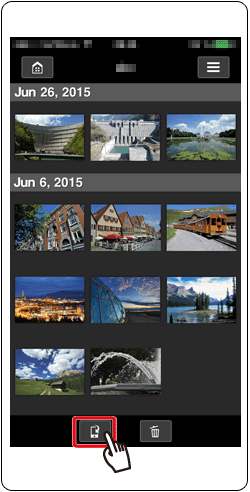
two. Save images from the camera to the smartphone.
When the connection has been established, the images stored in the camera will be displayed in [Camera Connect] equally shown in the example image beneath.
Tap the [  ] button appearing at the bottom of the screen.
3. When the selection screen is displayed, choose the desired images ( ), and then tap [Salve] (
 ).
).
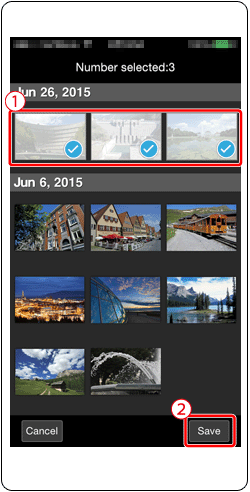
The selected images will be saved to the smartphone.
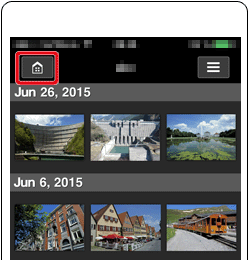
4. After the images accept been saved, tap the home button in the top left of the screen to render to the card.
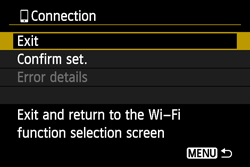
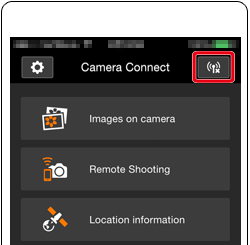
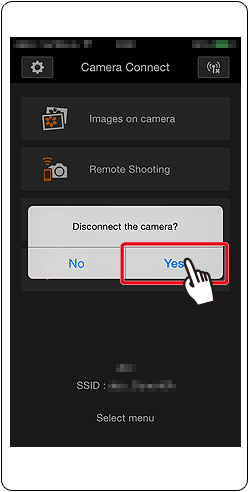
v. To stop the connectedness, tap the [  ] icon in the upper right of the screen, and then tap [Aye] when the confirmation screen appears.
This concludes the procedure for sending images to a smartphone via a wireless LAN.
IMPORTANT
- When viewable images are specified, functions of Camera Connect will be express.
- While connected, a picture cannot exist taken even if the camera'south shutter push button is pressed.
- Depending on the connection status, image brandish or shutter release may become slower than usual.
Note
- The connection will also be terminated if you set the power switch to [
 ], turn the Way Dial, or open the card slot/bombardment compartment cover.
 - When saving RAW images to a smartphone, they are saved as JPEG images.
- While connected, disabling the smartphone's ability saving function is recommended.
The camera cannot be connected via Wi-Fi using Camera Connect
The information registered to the smartphone for EOS Remote cannot be used for Camera Connect. Therefore, information technology will be necessary to re-register connection information for Camera Connect.
The procedures for making connections with Camera Connect are explained below.
one. Press the <MENU> push to brandish the menu screen.
2. Under the [ ] tab, select [Wi-Fi function], then press <Prepare>.
3. Select [ ] (Connect to smartphone) and press <SET>.
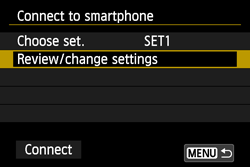
4. In [Choose prepare.] on the [Connect to smartphone] screen, select the settings to exist used when connecting with EOS Remote.
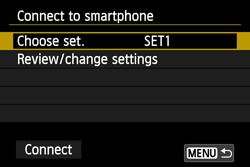
5. Select [Review/change settings] and press <SET>.
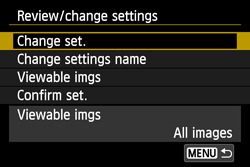
six. On the [Review/change settings] screen, select [Change ready.] and press <SET>.
7. When the [Connect'northward method] screen is displayed, perform the procedures explained from seven in Footstep i: Connect the smartphone to the wireless LAN to complete the settings.
*Android™, and Google Play™ are trademarks of Google Inc.

How To Transfer Photos From Canon 6d To Phone,
Source: https://hk.canon/en/support/8201713100
Posted by: mizellesompan.blogspot.com
0 Response to "How To Transfer Photos From Canon 6d To Phone"
Post a Comment